Getting started guide
Assuming you have a bit time, here's a detailed introduction to AssertJ Swing. You may want to have a look at the quick start guide that allows you to create and run an AssertJ Swing test case in the least possible time.
Get AssertJ Swing
AssertJ Swing artifacts are in Maven central repository. There are two main artifacts:
assertj-swing-testng and assertj-swing-junit.
It should be obvious that JUnit users should depend on assertj-swing-junit
while TestNG users should depend on assertj-swing-testng ;-)
TestNG
<dependency>
  <groupId>org.assertj</groupId>
  <artifactId>assertj-swing-testng</artifactId>
  <version>3.9.2</version>
  <scope>test</scope>
</dependency>
JUnit
<dependency>
  <groupId>org.assertj</groupId>
  <artifactId>assertj-swing-junit</artifactId>
  <version>3.9.2</version>
  <scope>test</scope>
</dependency>
If you use another dependency tool, please check this page to find the relevant AssertJ Swing dependency declaration for your tool.
JIDE support (optional)
For adding the JIDE dependent features you have to add assertj-swing-jide additionally to the
libraries for your test framework. Note that this step is only required for users of JIDE, else
it is optional!
<dependency>
  <groupId>org.assertj</groupId>
  <artifactId>assertj-swing-jide</artifactId>
  <version>3.9.0</version>
  <scope>test</scope>
</dependency>
Write your first GUI test
As the Assertions class is the main entry point to use AssertJ Core, the package
org.assertj.swing.fixture
is the main entry point to use AssertJ Swing. These fixtures provide specific methods to simulate
user interaction with a GUI component and also provide assertion methods that verify the state of such
a GUI component. Although you could work with the
Robot directly, the Robot is too
low-level and requires considerably more code than the fixtures.
There is one fixture per Swing component. Each fixture has the same name as the Swing component they can
handle ending with Fixture. For example, a JButtonFixture knows how to simulate user
interaction and verify the state of a JButton.
You're now going to write your first test, let's assume we have a simple JFrame that contains
a JTextField, a JLabel and a JButton:
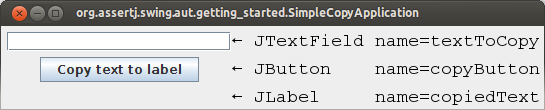
The expected behavior of this GUI is, when the user clicks on the button, the text of the text field should be copied to the label. Now, which steps are necessary to test this GUI?
The source code of this sample application can be found here. The test we are going to develop can be found here.
1. Enable checks for EDT access violation
AssertJ Swing provides the class FailOnThreadViolationRepaintManager that forces a test to fail if
access to GUI components is not performed on the EDT. You can find more details
here.
2. Create a fixture for the frame
Depending on the GUI to test, create a fixture to handle either a Frame or a Dialog
in the setUp() method of your test. The setUp() method is the method that
initializes the test fixtures, it should run every time before a test method is
executed:
- When using JUnit 3.8.x, this is the method named
setUp() - When using JUnit 4.x, this is the method marked with
@Before - When using TestNG, this is the method marked with
@BeforeMethod
Since our example uses a JFrame, we have to use a FrameFixture.
private FrameFixture window;

@Before
public void setUp() {
  SimpleCopyApplication frame = GuiActionRunner.execute(() -> new SimpleCopyApplication());
  window = new FrameFixture(frame);
  window.show(); // shows the frame to test
}
It may seem a little weird the way we create a new instance of SimpleCopyApplication. Since
creation of a frame triggers a paint action, we need to create the frame in the Event Dispatch
Thread (EDT). More details about the EDT and Swing threading can be found
here.
3. Write methods to test your GUI's behavior
Now you can start by using the fixtures to test the GUI. AssertJ Swing fixtures simulate a user interacting with the GUI in order to verify that such GUI behave as we expect. For our example, we need to verify that the text in the text field is copied to the label when the button is clicked:
@Test
public void shouldCopyTextInLabelWhenClickingButton() {
  window.textBox("textToCopy").enterText("Some random text");
  window.button("copyButton").click();
  window.label("copiedText").requireText("Some random text");
}
As you probably noticed already, in our example we look up UI components by their unique name. This is probably the most stable way, more about finding the components can be found here.
4. Cleaning up resources used by AssertJ Swing
AssertJ Swing forces sequential test execution, regardless of the testing framework. To do so, it uses a
semaphore to give access to the keyboard and mouse to a single test. Cleaning up resources after running
each test method releases the lock on such semaphore. To clean up resources simply call the method
cleanUp() on the AssertJ Swing fixture inside:
tearDown(), when using JUnit 3.8.x- the method marked with
@After, when using JUnit 4.x - the method marked with
@AfterMethod, when using TestNG
@After
public void tearDown() {
  window.cleanUp();
}
Putting everything together
public class SimpleCopyApplicationTest {
  private FrameFixture window;

  @BeforeClass
  public static void setUpOnce() {
    FailOnThreadViolationRepaintManager.install();
  }

  @Before
  public void setUp() {
    SimpleCopyApplication frame = GuiActionRunner.execute(() -> new SimpleCopyApplication());
    window = new FrameFixture(frame);
    window.show(); // shows the frame to test
  }

  @Test
  public void shouldCopyTextInLabelWhenClickingButton() {
    window.textBox("textToCopy").enterText("Some random text");
    window.button("copyButton").click();
    window.label("copiedText").requireText("Some random text");
  }

  @After
  public void tearDown() {
    window.cleanUp();
  }
}
Alternatively, extend a AssertJ Swing test case
AssertJ Swing provides a base test class, to simplify creation of GUI tests. The following code listing
provides the same functionality as the code above, with less code, thanks to
AssertJSwingJUnitTestCase. The source can be found here.
public class SimpleCopyApplication_UseBaseTest extends AssertJSwingJUnitTestCase {
  private FrameFixture window;

  @Override
  protected void onSetUp() {
    SimpleCopyApplication frame = GuiActionRunner.execute(() -> new SimpleCopyApplication());
    // IMPORTANT: note the call to 'robot()'
    // we must use the Robot from AssertJSwingJUnitTestCase
    window = new FrameFixture(robot(), frame);
    window.show(); // shows the frame to test
  }

  @Test
  public void shouldCopyTextInLabelWhenClickingButton() {
    window.textBox("textToCopy").enterText("Some random text");
    window.button("copyButton").click();
    window.label("copiedText").requireText("Some random text");
  }
}Robot. The base test
case creates one for you! If there is more than one Robot in your test, only the
first one will have access to the screen, while the rest will block till they get the
screen lock. A Robot can be created manually or indirectly using the constructors
FrameFixture(Frame) or DialogFixture(Dialog). Please use the overloaded
versions that take a Robot as parameter, passing the already created Robot
(robot()).